Heavy Bowgun Builds & Loadouts

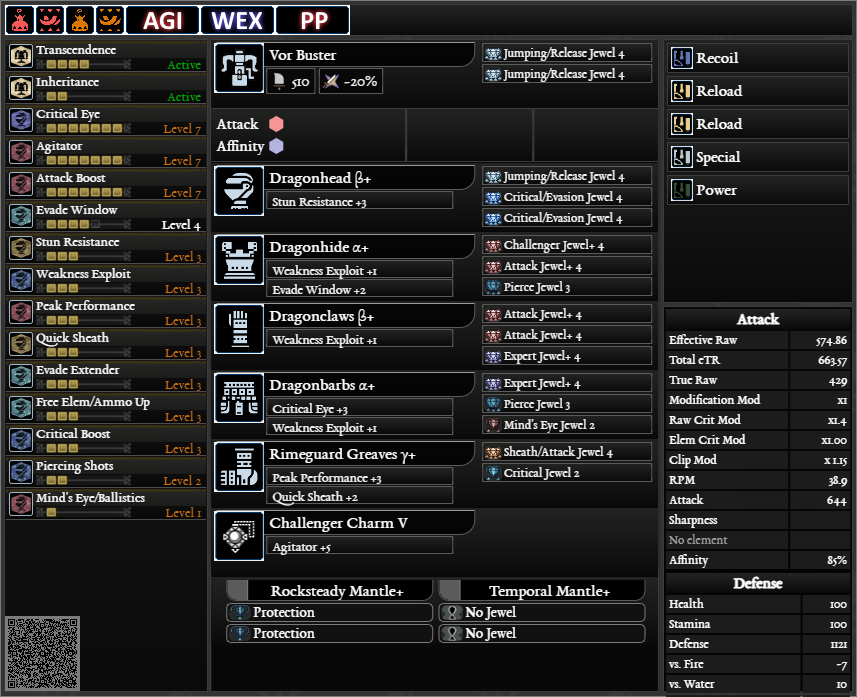
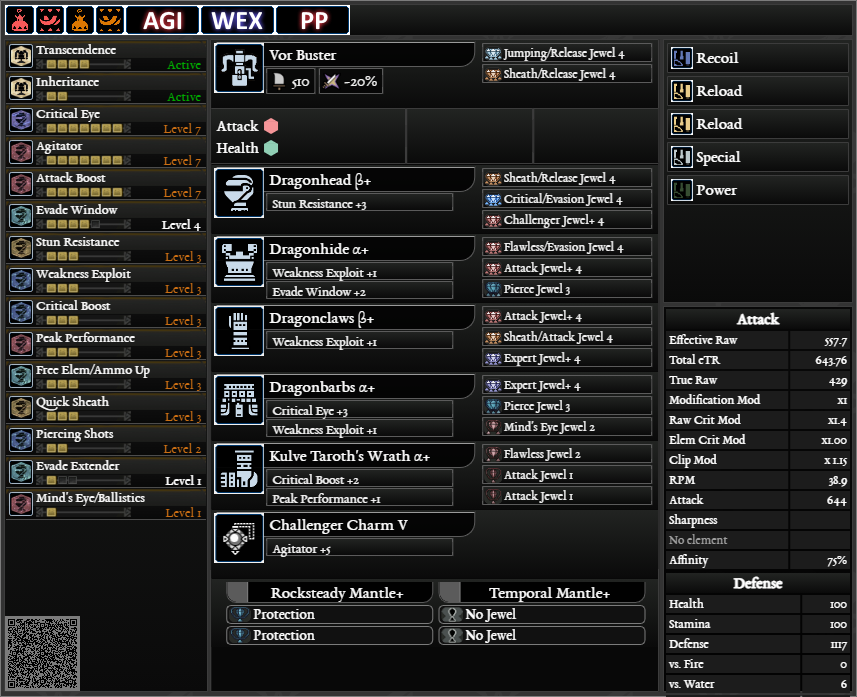
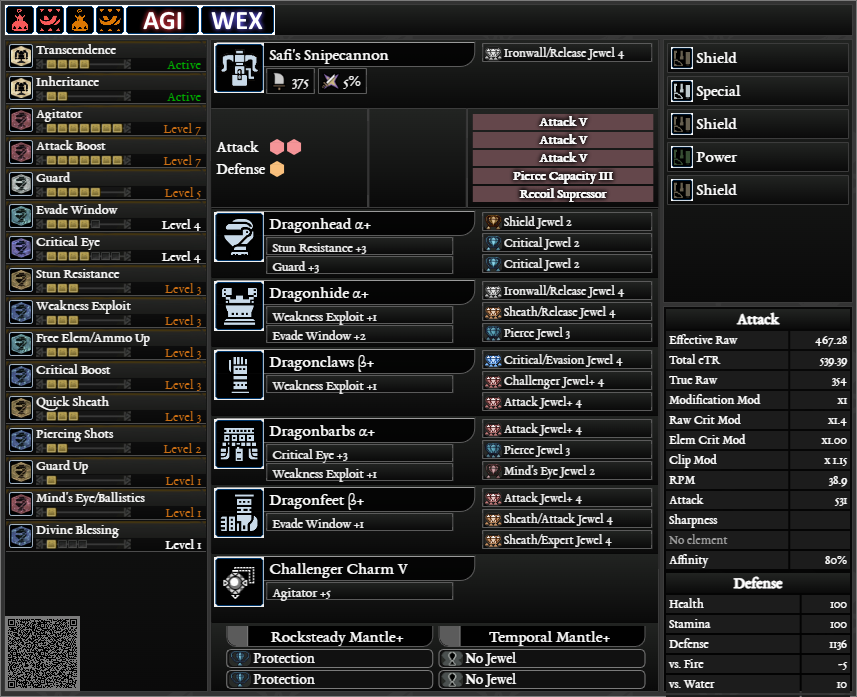
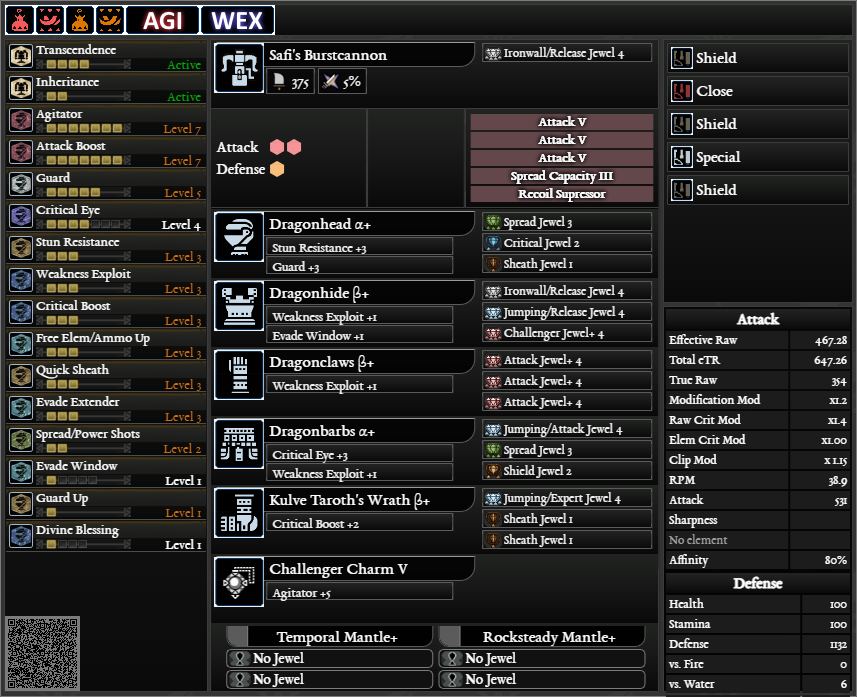
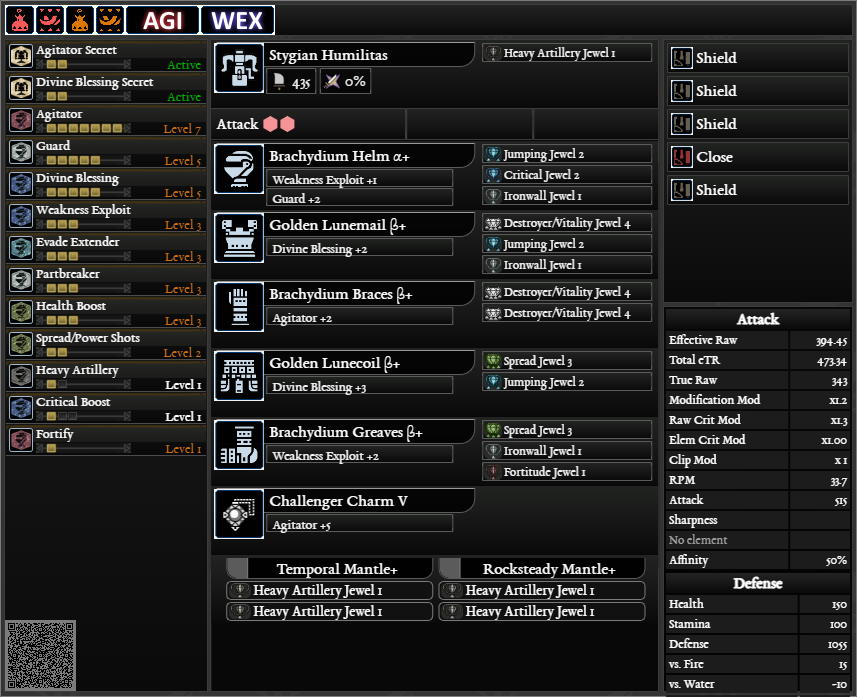
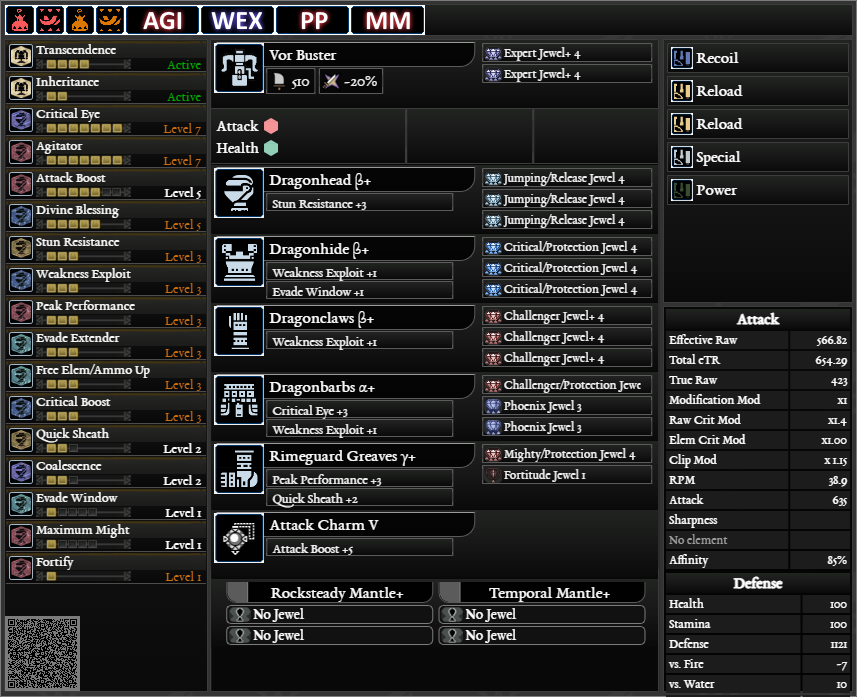
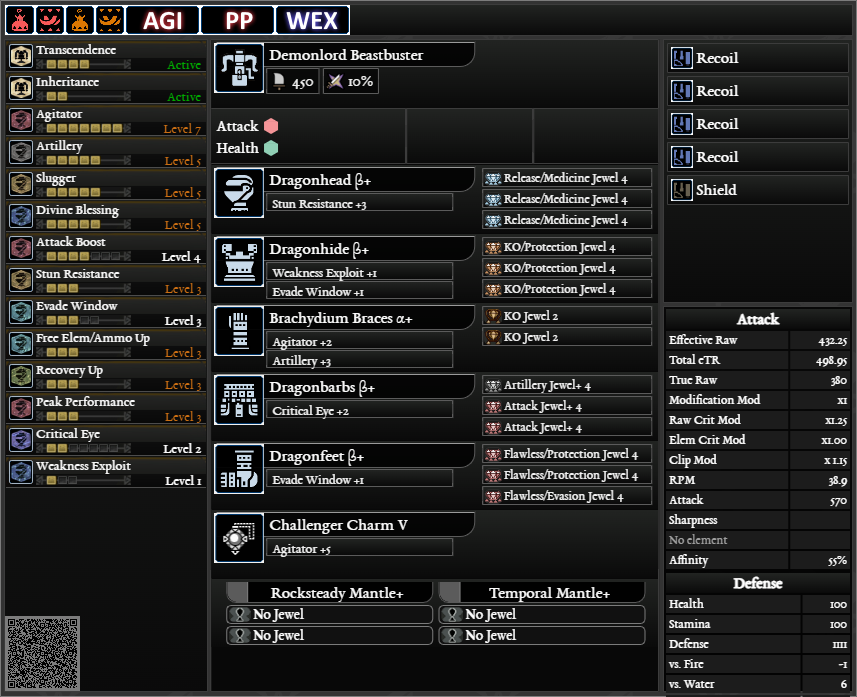
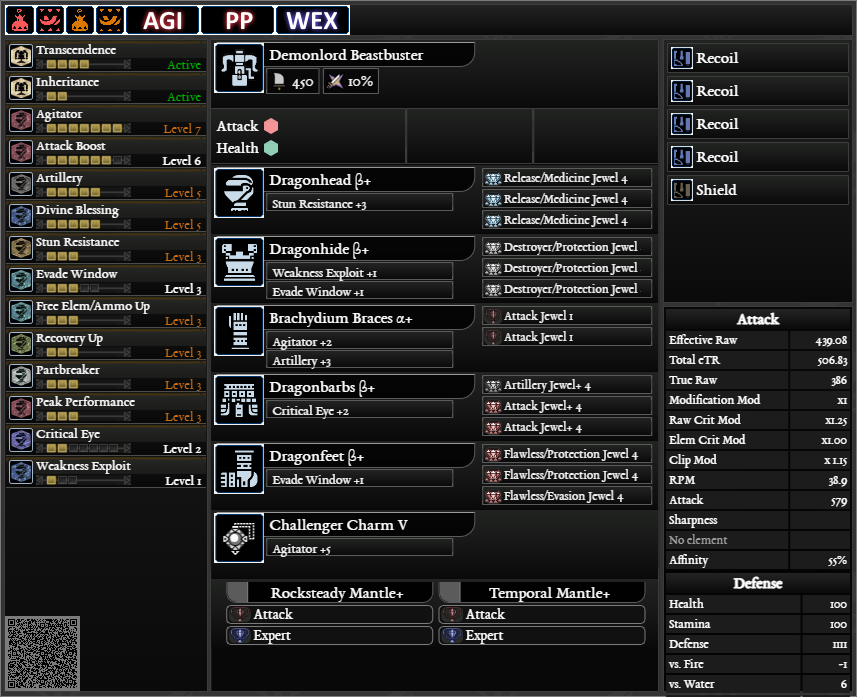
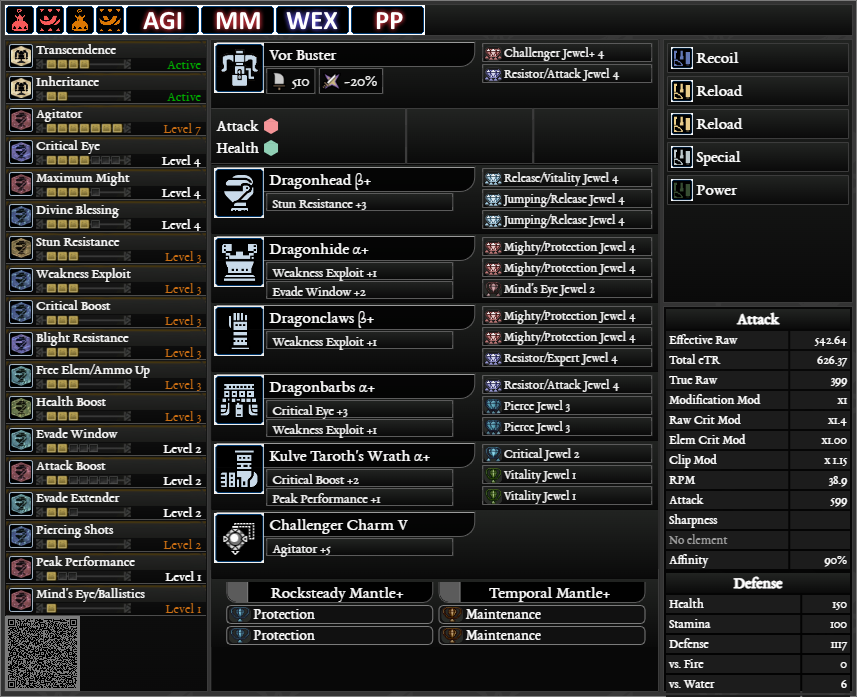
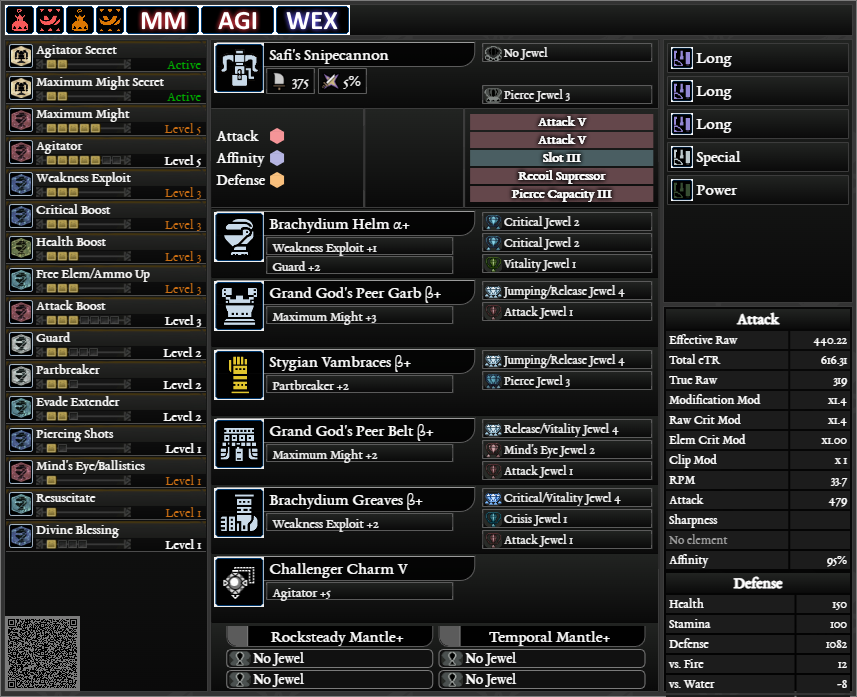
The following builds & loadouts have been created by Banri. Otherwise will be noted in the build itself if created by another.


Vor Buster Pierce (Max DPS) Velkhana Y


  • Make sure to set-up your ammo-crafting-wheel. You will need Piercing Ammo 1 (Craft All) and Piercing Ammo 3 (Craft all)
  • Highest Possible Pierce Damage
  • This set has been finalize with every possible skill maxed out.

  • Vor Buster Pierce (Max DPS) Kulve A


  • Make sure to set-up your ammo-crafting-wheel. You will need Piercing Ammo 1 (Craft All) and Piercing Ammo 3 (Craft all)
  • Highest Possible Pierce Damage
  • This set has been semi-finalized with every possible skill almost maxed out. This is a good choice for those who have not cleared AT Velkhana for Rimeguard Legs Y.
  • Trivia: This set was Banri's old faithful before upgrading to Vor Buster Pierce 1 set.

  • Vor Buster Pierce (Max DPS) w/Shield


  • Make sure to set-up your ammo-crafting-wheel. You will need Piercing Ammo 1 (Craft All) and Piercing Ammo 3 (Craft all)
  • Highest Possible Pierce Damage
  • Utilizes a Shield setup with Guard Up. Brings Damage down but increases defensive capabilities. If you want more damage, see Vor Buster Pierce 1 or 2


  • Make sure to set-up your ammo-crafting-wheel. You will need Spread Ammo 1 (Craft All) and Spread Ammo 3 (Craft all)
  • Highest Possible Pierce Damage
  • This set has been semi-finalized with every possible skill almost maxed out. This is a good choice for those who have not cleared AT Velkhana for Rimeguard Legs Y.
  • Trivia: This set was Banri's old faithful before upgrading to Vor Buster Spread 1 set.

  • Vor Buster Spread (Max DPS) Kulve A


  • Max DPS Spread
  • Does not utilize a shield. If you want a shield, see Vor Buster Spread (S)
  • Make sure to set-up your ammo-crafting-wheel. You will need Spread Ammo 1 (Craft All) and Spread Ammo 3 (Craft all)

  • Vor Buster Spread (S) w/Shield


  • Max DPS Spread
  • Utilizes a Shield setup with Guard Up. Brings Damage down but increases defensive capabilities. If you want more damage, see Vor Buster Spread
  • Make sure to set-up your ammo-crafting-wheel. You will need Spread Ammo 1 (Craft All) and Spread Ammo 3 (Craft all)

  • Anti-Fatalis Spread


  • Max DPS Spread
  • Utilizes a Shield setup with Guard Up. Brings Damage down but increases defensive capabilities. If you want more damage, see Vor Buster Spread
  • Built in Partbreaker to break Fatalis head for the Fatalis Evil Eyes
  • Make sure to set-up your ammo-crafting-wheel. You will need Spread Ammo 1 (Craft All) and Spread Ammo 3 (Craft all)

  • Vor Buster Slicing


  • Capable of cutting a tail before all 60 Slicing Ammo is out in most situations. May need to restock from a camp.
  • It is recommended to swap out to another build after tail is severed.
  • Make sure to set-up your ammo-crafting-wheel. You will need Slicing Ammo (Craft All)

  • Beastbuster Sticky KO 5


  • KO 5
  • Make sure to set-up your ammo-crafting-wheel. You will need Sticky Ammo 1 (Craft All) and Sticky Ammo 3 (Craft all)
  • Sticky and KO 5 coupled with a very skilled piercer is one of the deadly combinations.
  • Perfect for the Guiding Lands

  • Beastbuster Sticky Partbreaker 3


  • Redesigned from Beastbuster Sticky KO 5 to incorporate Lvl 3 Partbreaker.
  • Very useful vs Safi Siege when breaking wings and head.
  • Make sure to set-up your ammo-crafting-wheel. You will need Sticky Ammo 1 (Craft All) and Sticky Ammo 3 (Craft all)

  • Anti-Alatreon Pierce


  • Piercing Build specially made for Alatreon Event Quests. Note that you will need 3 others that do element damage to KO Alatreon.
  • Make sure to set-up your ammo-crafting-wheel. You will need Piercing Ammo 1 (Craft All) and Piercing Ammo 3 (Craft all)

  • Safi Snipecannon Pierce


  • Pre Fatalis Vor Buster Piercing Build
  • Max DPS Pre Fatalis
  • Make sure to set-up your ammo-crafting-wheel. You will need Piercing Ammo 1 (Craft All) and Piercing Ammo 3 (Craft all)