How to Unlock the Guiding Lands
To put it simply, beat Monster Hunter World: Iceborne's main story. After credits role, speak to the Field Team Leader in Seliana, and you'll depart toward the Elder's Recess to look for Ruiner Nergigante. However, this is simply a ruse, and instead you'll be treated to a cutscene before landing in the Guiding Lands, which appears to have multiple biomes in one place.
First Exploration

You and your handler land, and get a gander at what looks like the Ancient Forest. Pick up the "Signs of a Turf War" in front of you, then continue following your Handler on a small tour of the Guiding Lands. After making camp, the Handler states that the tracks you found (Signs of a Turf War) have an odd secretion unique to this new region. Head down to Area 2 to trigger a cutscene. You stumble into an area that looks like the Wildspire Waste as Rathalos, Diablos, and a new monster to Iceborne, Zinogre, battle it out.
You won't be able to fight Zinogre just yet. Go back to Seliana using the "End Expedition" option in the menu. See How to Unlock Zinogre in Monster Hunter World: Iceborne for full instructions.
From now on, you can choose to go to the Guiding Lands on an expedition from the Quest Board or the world map.

How the Guiding Lands Work
The Guiding Lands are what constitutes the main crux of Monster Hunter World: Iceborne's endgame. They consist of a new map that features biomes that equate to six of the previous larger biomes you've been to, each transitioning from one into another. The six included biomes here are the Forest Region taking after the Ancient Forest, the Coral Region representing the Coral Highlands, the Rotted Region as the ambassador for the Rotten Vale, the Wildspire Region as the companion to the Wildspire Waste, Tundra Region representing the Hoarfrost Reach, and the Volcanic Region representing parts of the Elder's Recess. Each Region in the Guiding Lands has a Level associated with it, which will unlock new monsters and tempered monsters as the level rises.
How to Increase Region Levels
As you research large monsters in the regions, your region level incrementally increases. Region Levels affect the species of monsters that will appear in the Guiding Lands, as illustrated by the Regional Monster Charts below. Anything that awards Research Points will also incrementally increase a Region's level, such as:
- Pick up monster tracks in that region.
- Break monster parts in the region.
- Break monster parts of a monster native to that region.
- Capture or slay monsters in the region.
- Capture or slay monsters native to that region.
- Trapping a monster. Know that increasing one Region's level will decrease the others.
              As you get to higher region levels within the Guiding Lands, it becomes very difficult to keep all levels up simultaneously, as hunting a monster within one region will decrease another, especially if that monster is exclusive to a single region.
              I recommend trying to level up one or two regions and letting the others fall. Then you can switch when you're ready to.
For Example
Anjanath can be lured to both the Forest and Wildspire Regions. If it's lured to the Forest Region, but you mostly fight it and then slay it in the Wildspire Region, the Wildspire Region will be affected more than the Forest Region, though both will increase. The other regions that Anjanath is not native to will decrease incrementally.
How to Tell Which Monsters Increase Which Region Level
To tell which Region a monster is endemic to, and in turn, which region it will provide experience to, go to the following from anywhere:
Options > Info > Check Special Tracks
You can only see this once you've analyzed tracks for that monster. You can also reference the Guiding Lands Regional Monster List below.
How to Lure Monsters
Monsters in The Guiding Lands usually leave behind special tracks from Signs of a Turf War. You can also get special tracks by slaying or capturing monsters, or by breaking a large monster's body part. Once you fully analyze the special tracks, you can use these to lure out monsters from a specific region. You can do this by talking to the Handler at one of the campsites, then choose which specific monster you lure at which region. After a little while, the monster should appear at the region you chose. When the region's level is high enough, any monster that you lure will automatically be a tempered variant.
Region Level Cap Master Rank Requirements
At first, your Guiding Lands Region Levels will be capped at 4. The Region Level Cap will rise as your Master Rank increases. You must complete new Assigned Quests to continue increasing your Master Rank Level.
How to Find New Monsters in the Guiding Lands

Zinogre isn't the only new monster found within the Guiding Lands. Leveling up the different regions can trigger quests to appear within the guiding lands to hunt different monsters. Here is the list of monsters you can find in the Guiding Lands and how to unlock them.
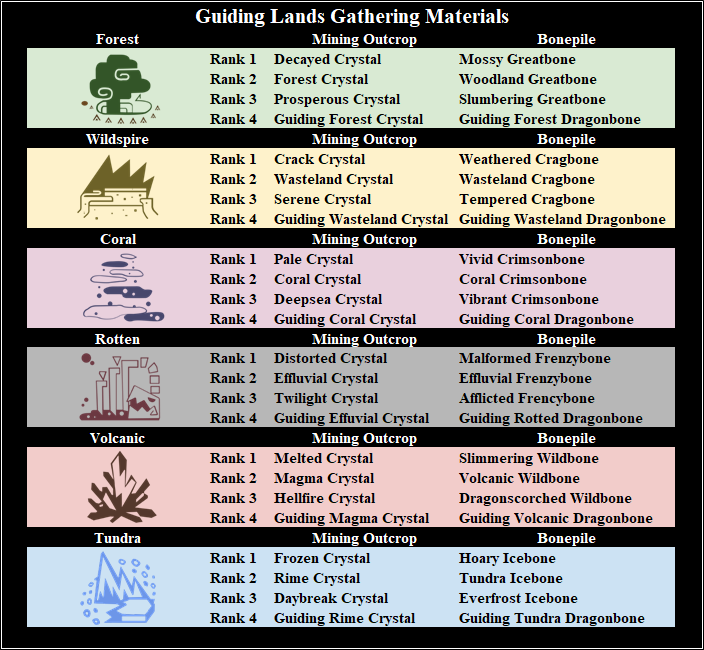
Resource Information
Bonepiles, Mining Outcrops

Each Region in the Guiding Lands has Bonepiles and Mining Outcrops that give special materials that can't be obtained anywhere else. There are two different progress bars for Resource Levels of each Region, one for Bonepiles, and one for Mining Outcrops. You can find this by tabbing over to Resource Information from Region Levels within your Map. You'll increase the progress of these bars each time you gather from a Bonepile or Mining Outcop. The higher the bar, the more variety of items you'll be able to get from gathering points.

When the bar is leveled up all the way, a single special gathering point will spawn that can be mined once ever. An exclamation point will appear next to the progress bar when this occurs. This gathering point guarantees the rare, unique item from that region. Then, the bar needs to be leveled back up again for another point to spawn again.
Monster Materials in the Guiding Lands
When you fight monsters in the Guiding Lands, carve them, break their parts, or flinch shot them, they often drop special materials unique to the Guiding Lands. These take the form of two unique items per monster species -- one for the normal version, one for the tempered version (e.g. a Barioth might drop Coldblooded Icefang, but a Tempered Barioth will only drop Tempered Icefangs). Note that due to a bug, one point of Geologist will double the number of drops - always equip Geologist in the Guiding Lands. In addition to the unique materials, monsters will also drop bones common to many species, and tempered monsters will drop spiritvein gems used for master rank augmenting. The bone system is explained below:
Non-Tempered Monsters
Tempered Monsters
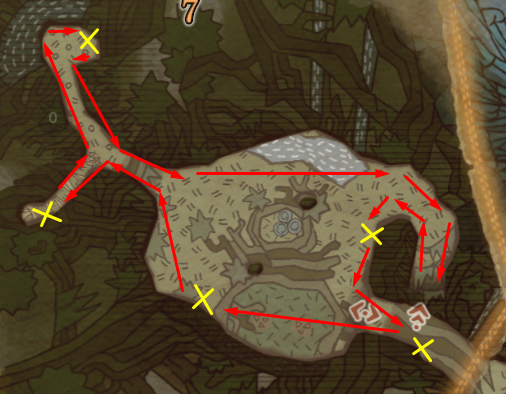
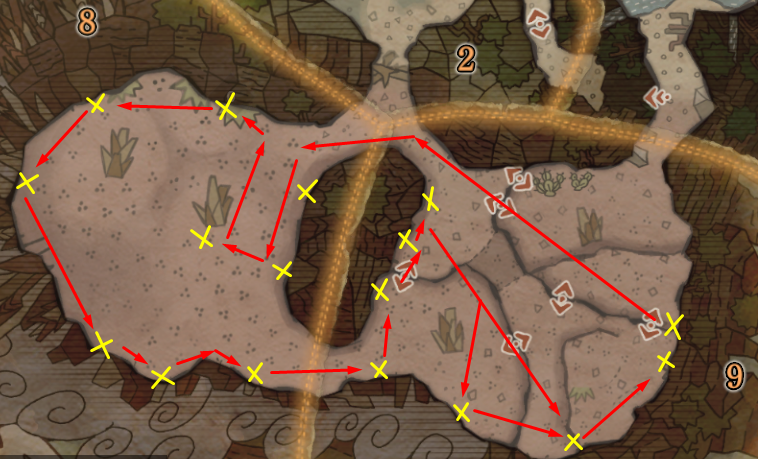
Guiding Lands Gathering Materials
Region Gathering Path
Forest Region

Wildspire Region
Coral Region
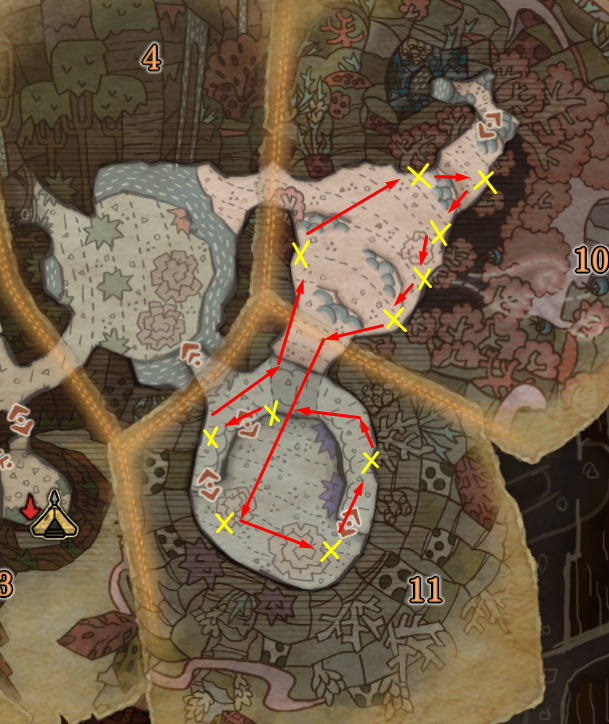
Rotten Region

Volcanic Region

Tundra Region

Helpful Gathering Build

Source: DarcBlade YouTube
List of Monster Materials
There is no special images here, as to make it easier for players to simply use "Control + F" to find their targeted info.
| Monster | Normal Material | Tempered Material |
|---|---|---|
| Anjanath | Flickering Flamepelt Forest / Wildspire (1, 2, 3, 4) |
Tempered Flamepelt Forest / Wildspire (5, 6, 7) |
| Fulgur Anjanath | Crackling Thunderpelt All Regions (1, 2, 3, 4) |
Tempered Thunderpelt All Regions (5, 6, 7) |
| Banbaro | Ancient Great Horn Coral / Rotten / Volcanic / Tundra (1, 2, 3) Forest / Wildspire (2, 3) |
Tempered Great Horn All Regions (4, 5, 6, 7) |
| Barioth | Coldblooded Icefang Tundra (2, 3, 4, 5) |
Tempered Icefang Tundra (6, 7) |
| Barroth | Muddy Crown Wildspire (1, 2, 3) |
Tempered Crown Wildspire (4, 5, 6, 7) |
| Blackveil Vaal Hazak | Twilight Fang Rotten (5, 6) |
Tempered Twilight Fang Rotten (7) |
| Brachydios | Glossy Ebonshell Volcanic (2, 3, 4, 5) |
Tempered Ebonshell Volcanic (6, 7) |
| Diablos | Twisted Bravehorn Wildspire (2, 3, 4) |
Twisted Temperhorn Wildspire (5, 6, 7) |
| Black Diablos | Blackcurl Tyranthorn Wildspire (3, 4, 5) |
Blackcurl Temperhorn Wildspire (6, 7) |
| Dodogama | Heavy Jaw Volcanic (1, 2, 3, 4, 5, 6, 7) |
N/A |
| Glavenus | Smoldering Tailedge Wildspire (2, 3, 4, 5) Forest / Volcanic (3, 4, 5) |
Tempered Tailedge Forest / Wildspire / Volcanic (6, 7) |
| Acid Glavenus | Honed Tailblade Rotten (3, 4, 5) |
Tempered Tailblade Rotten (6, 7) |
| Great Girros | Night Hood Rotten (1, 2, 3, 4, 5, 6, 7) |
N/A |
| Great Jagras | Rugged Mane Forest (1, 2, 3, 4, 5, 6, 7) |
N/A |
| Kirin | Solemn Azure Horn Coral (5, 6) |
Tempered Azure Horn Coral (7) |
| Kulu-Ya-Ku | Colorful Plume Wildspire (1, 2, 3, 4, 5, 6, 7) |
N/A |
| Kushala Daora | Stormcall Steelwing Forest / Volcanic (5, 6) |
Tempered Steelwing Forest / Volcanic (7) |
| Lavasioth | Incandescent Magmafin Volcanic (1, 2, 3) |
Tempered Magmafin Volcanic (4, 5, 6, 7) |
| Legiana | Smooth Icehide Coral / Tundra (2, 3, 4) |
Tempered Icehide Coral / Tundra (5, 6, 7) |
| Shrieking Legiana | Crystal Frozenhide Tundra (3, 4, 5) |
Tempered Frosthide Tundra (6, 7) |
| Namielle | Enchanting Finehide Coral (5, 6) |
Tempered Trancehide Coral (7) |
| Nargacuga | Assassin Cutwing Forest (2, 3, 4, 5) Coral (3, 4, 5) |
Tempered Cutwing Forest / Coral (6, 7) |
| Odogaron | Fatal Rendclaw Rotten (2, 3, 4) Coral (3, 4) |
Tempered Rendclaw Coral / Rotten (5, 6, 7) |
| Ebony Odogaron | Soulrender Talon All Regions (3, 4, 5) |
Tempered Talon All Regions (6, 7) |
| Paolumu | Rubbery Shell Coral (1, 2, 3) |
Tempered Rubbery Shell Coral (4, 5, 6, 7) |
| Nightshade Paolumu | Obsidian Fur Wildspire (1, 2, 3, 4) Forest (2, 3, 4) |
Tempered Hide Forest / Wildspire (5, 6, 7) |
| Pukei-Pukei | Fragrant Poison Sac Forest / Wildspire (1, 2, 3) |
Tempered Poison Sac Forest / Wildspire (4, 5, 6, 7) |
| Coral Pukei-Pukei | Hydrated Sac Coral (1, 2, 3) |
Tempered Torrent Sac Coral (4, 5, 6, 7) |
| Radobaan | Inkstained Oilshell+ Rotten (1, 2, 3) |
Tempered Oilshell+ Rotten (4, 5, 6, 7) |
| Rajang | Bloodthirsty Glimmerpelt Forest / Wildspire / Coral / Rotten / Tundra (3, 4, 5, 6, 7) Volcanic (3) |
Tempered Glimmerpelt Volcanic (7) |
| Rathalos | King's Scale Forest (2, 3, 4) Volcanic (4, 5) |
Tempered Red Scale Forest / Volcanic (5, 6, 7) |
| Azure Rathalos | Azure Scale Forest (3, 4, 5) Volcanic (4, 5) |
Tempered Azure Scale Forest / Volcanic (6, 7) |
| Silver Rathalos | Moonlight Scale Volcanic (6, 7) Coral (6) |
Tempered Silver Scale Coral (7) |
| Rathian | Queen's Scale Wildspire (1, 2, 3, 4) Forest (2, 3, 4) |
Tempered Green Scale Forest / Wildspire (5, 6, 7) |
| Gold Rathian | Scorching Scale Volcanic (6, 7) Wildspire (6) |
Tempered Gold Scale Forest / Wildspire (7) |
| Pink Rathian | Pink Scale Wildspire / Coral (2, 3, 4) |
Tempered Pink Scale Wildspire / Coral (5, 6, 7) |
| Ruiner Nergigante | Extinction Greathorn Forest / Wildspire / Coral / Rotten / Volcanic (5, 6, 7) Tundra (5, 6) |
Annihilating Temperhorn All Regions (7) |
| Savage Deviljho | Bloodstained Ebonhide All Regions (5, 6) |
Spattered Hide All Regions (7) |
| Seething Bazelgeuse | Crimson Blastscale Volcanic (4, 5, 6) |
Tempered Blastscale Volcanic (7) |
| Teostra | Hellfire Mane Wildspire / Volcanic (5, 6) |
Tempered Crimson Mane Wildspire / Volcanic (7) |
| Lunastra | Azure Mane Wildspire / Volcanic (5, 6) |
Tempered Azure Mane Wildspire / Volcanic (7) |
| Tigrex | Strongman's Jaw Rotten (2, 3, 4, 5) Forest / Wildspire / Volcanic / Tundra (3, 4, 5) |
Tempered Jaw Forest / Wildspire / Rotten / Volcanic / Tundra (6, 7) |
| Brute Tigrex | Shuddering Darkjaw Rotten (6) |
Tempered Ebonjaw Rotten (7) |
| Tobi-Kadachi | Blinding Cathode Forest (1, 2, 3) |
Tempered Cathode Forest (4, 5, 6, 7) |
| Viper Tobi-Kadachi | Enticing Viperthorn Tundra (1, 2, 3, 4) |
Tempered Viperthorn Tundra (5, 6, 7) |
| Tzitzi-Ya-Ku | Dazzling Photophore+ Coral (1, 2, 3, 4, 5, 6, 7) |
N/A |
| Uragaan | Metallic Scute Volcanic (2, 3, 4) |
Tempered Scute Volcanic (5, 6, 7) |
| Velkhana | Aurora Crownhorn Forest / Wildspire / Coral / Volcanic / Tundra (5, 6) |
Tempered Crownhorn Forest / Wildspire / Coral / Volcanic / Tundra (7) |
| Yian Garuga | Sinister Silverpelt Forest (3, 4, 5) |
N/A |
| Scarred Yian Garuga | N/A | Tempered Silverpelt Forest (6, 7) |
| Zinogre | Charged Deathly Shocker Forest / Coral (2, 3, 4, 5) |
Tempered Shocker Forest / Coral (6, 7) |
| Stygian Zinogre | Gushing Dragonhold Tundra (4, 5, 6) |
Tempered Dragonhold Tundra (7) |
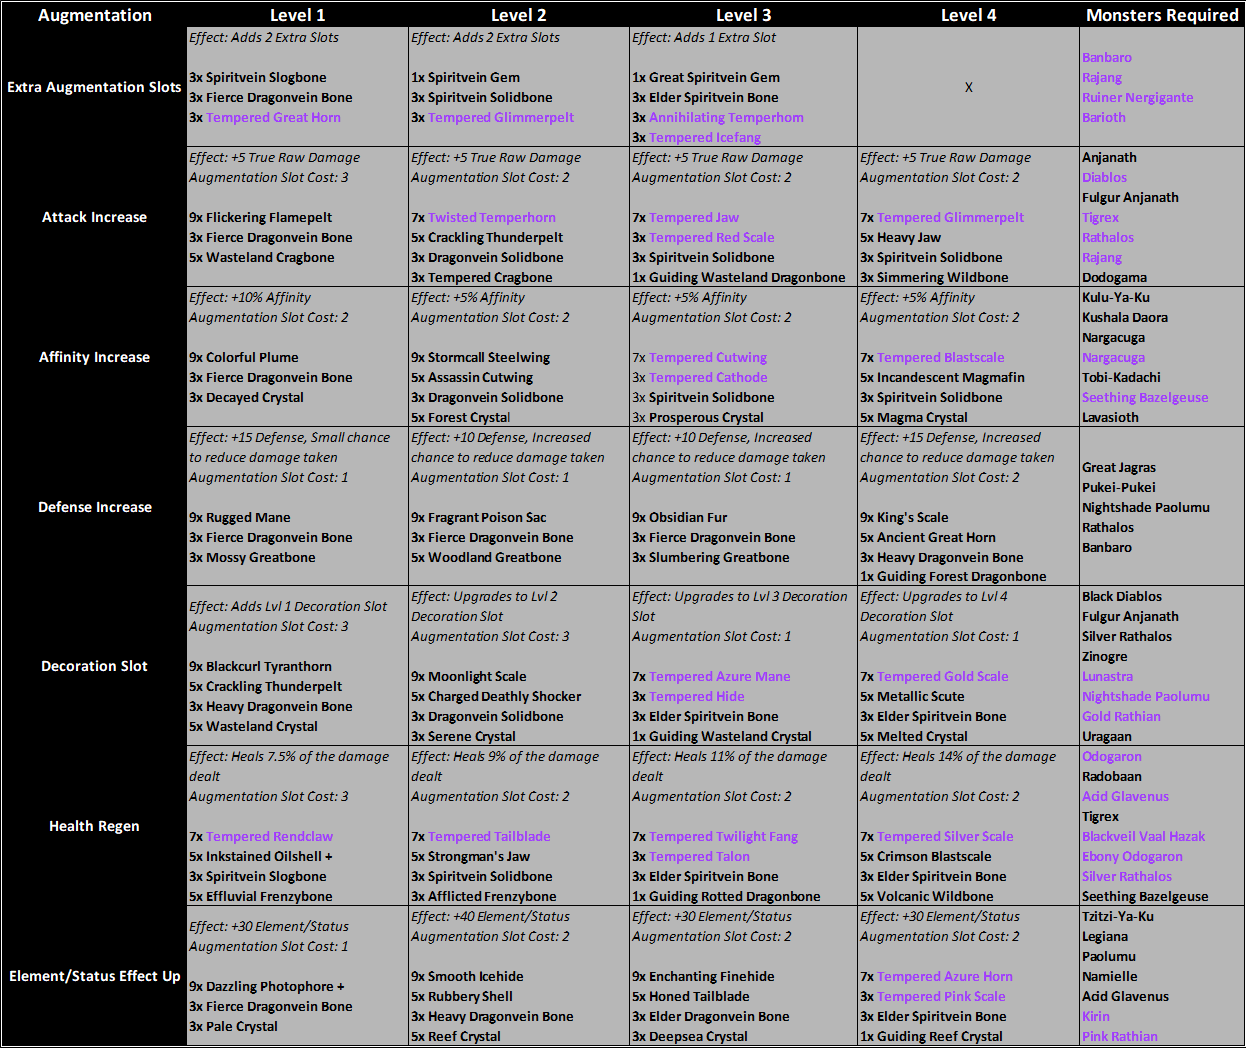
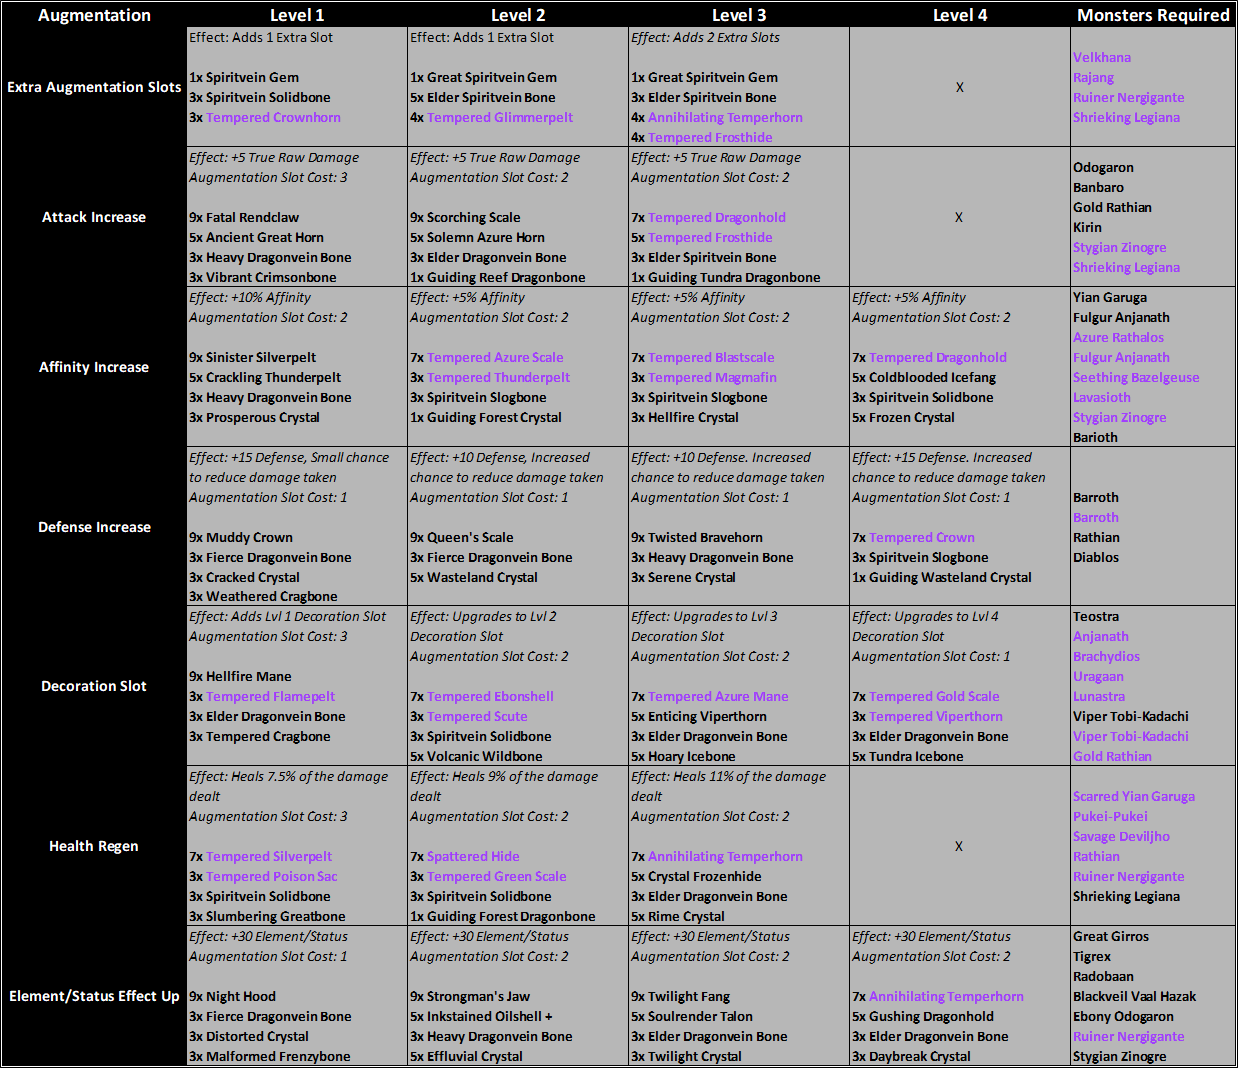
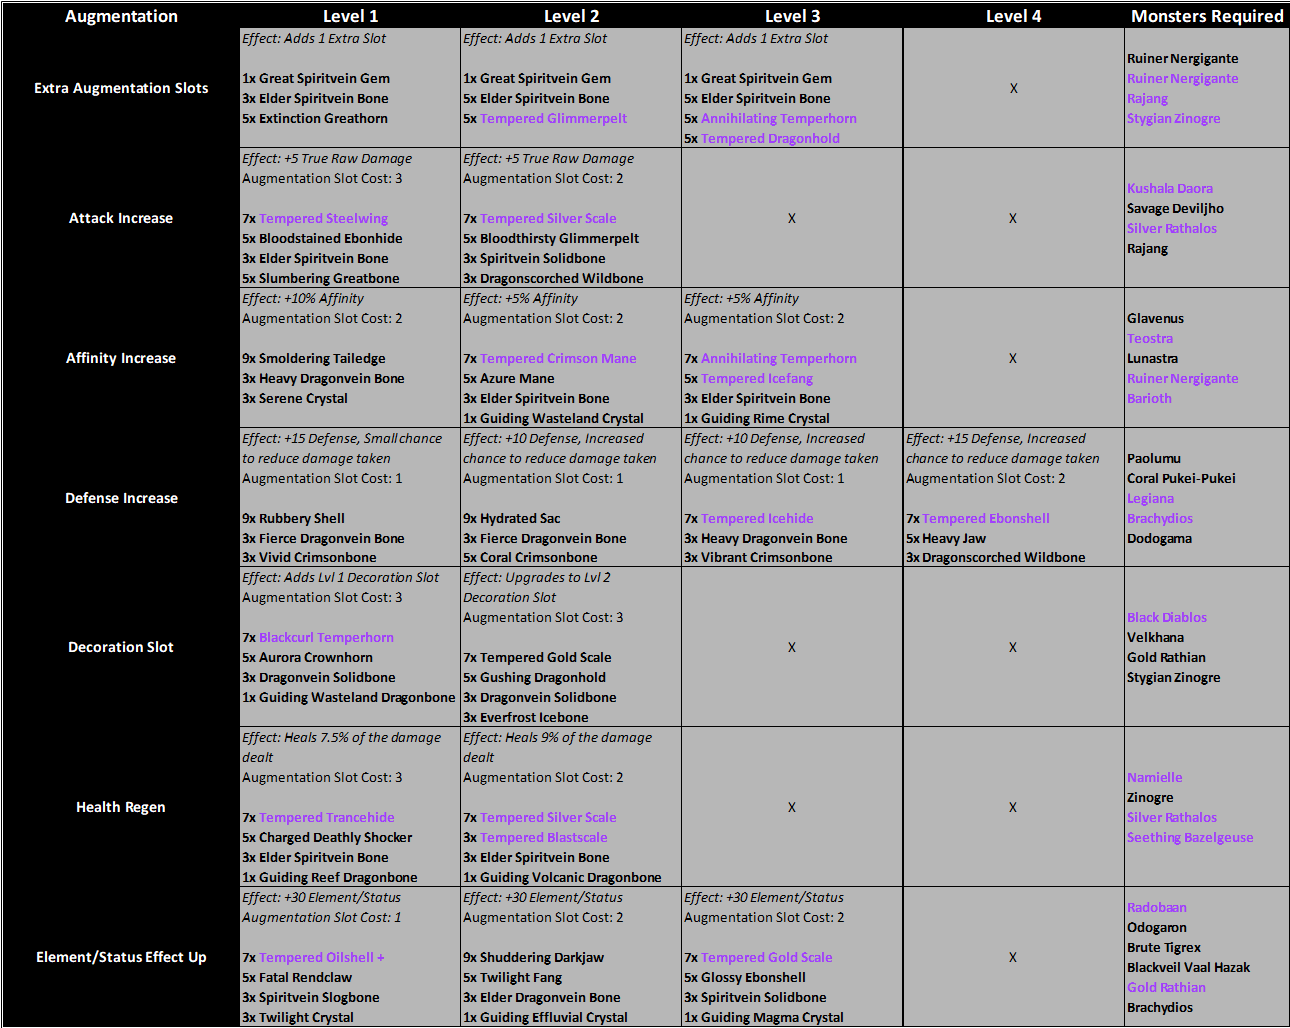
Augmentation
Rarity 10
Rarity 11
Rarity 12
How to Analyze Special Tracks / Lure Out Monsters
As you hunt monsters, break monster parts, and pick up Signs of a Turf War in the Guiding Lands, you may get a progress bar on the side of your main screen. It will say a type of monster such as "Fanged Wyvern" and then have a few dots ending in a footprint. These are special tracks left by monsters within the Guiding Lands, and are how you come to be able to lure out specific monsters at your leisure. Each dot represents a stage of progress. The monster you can lure out once the analysis is complete will fall under the category of the track. The length of the bar often will indicate how rare of a monster it is. A Great Jagras may only have 2 dots while an Elder Dragon may have 8. Here's how to progress the analysis level:
- Break Monster Parts
Find a monster in the Guiding Lands, and break a part. This is the only way to guarantee your current analysis progress level will go up. Also, this only works once per individual monster, so it may be most efficient to go from monster to monster breaking parts. Lastly, try to go after a monster that shares the category of your current track being analyzed for a bonus. For example, breaking a part from Rathalos, a Flying Wyvern, will increase a Flying Wyvern special track progress bar by two instead of one. If you break a part from the monster whose track you're analyzing, it will be completed instantly! - Collect Signs of a Turf War
There are some special tracks marked as “Signs of a Turf War.” Collecting these guarantees at least one track is received, either an entirely new one or progress on a current one, depending on what type of monster left it behind. These Turf War signs will pop up in the same spots, so be on the look out for larger-than-usual piles of remains or goo on walls. - Kill or Capture Monsters
Killing or capturing a monster in the Guiding Lands only gives you a chance to unlock new special tracks to analyze or increase your current track’s levels, but the type of monster doesn’t matter. - Defeat Tempered Monsters
Defeating a Tempered Monster in the Guiding Lands guarantees that either one of your current analysis bars will be completed automatically, or you'll receive a pre-completed analysis track immediately.

You can find all your analyzed monsters so far along with your current analyzation progress under the info tab on the options menu.
Guiding Lands Regional Monster List
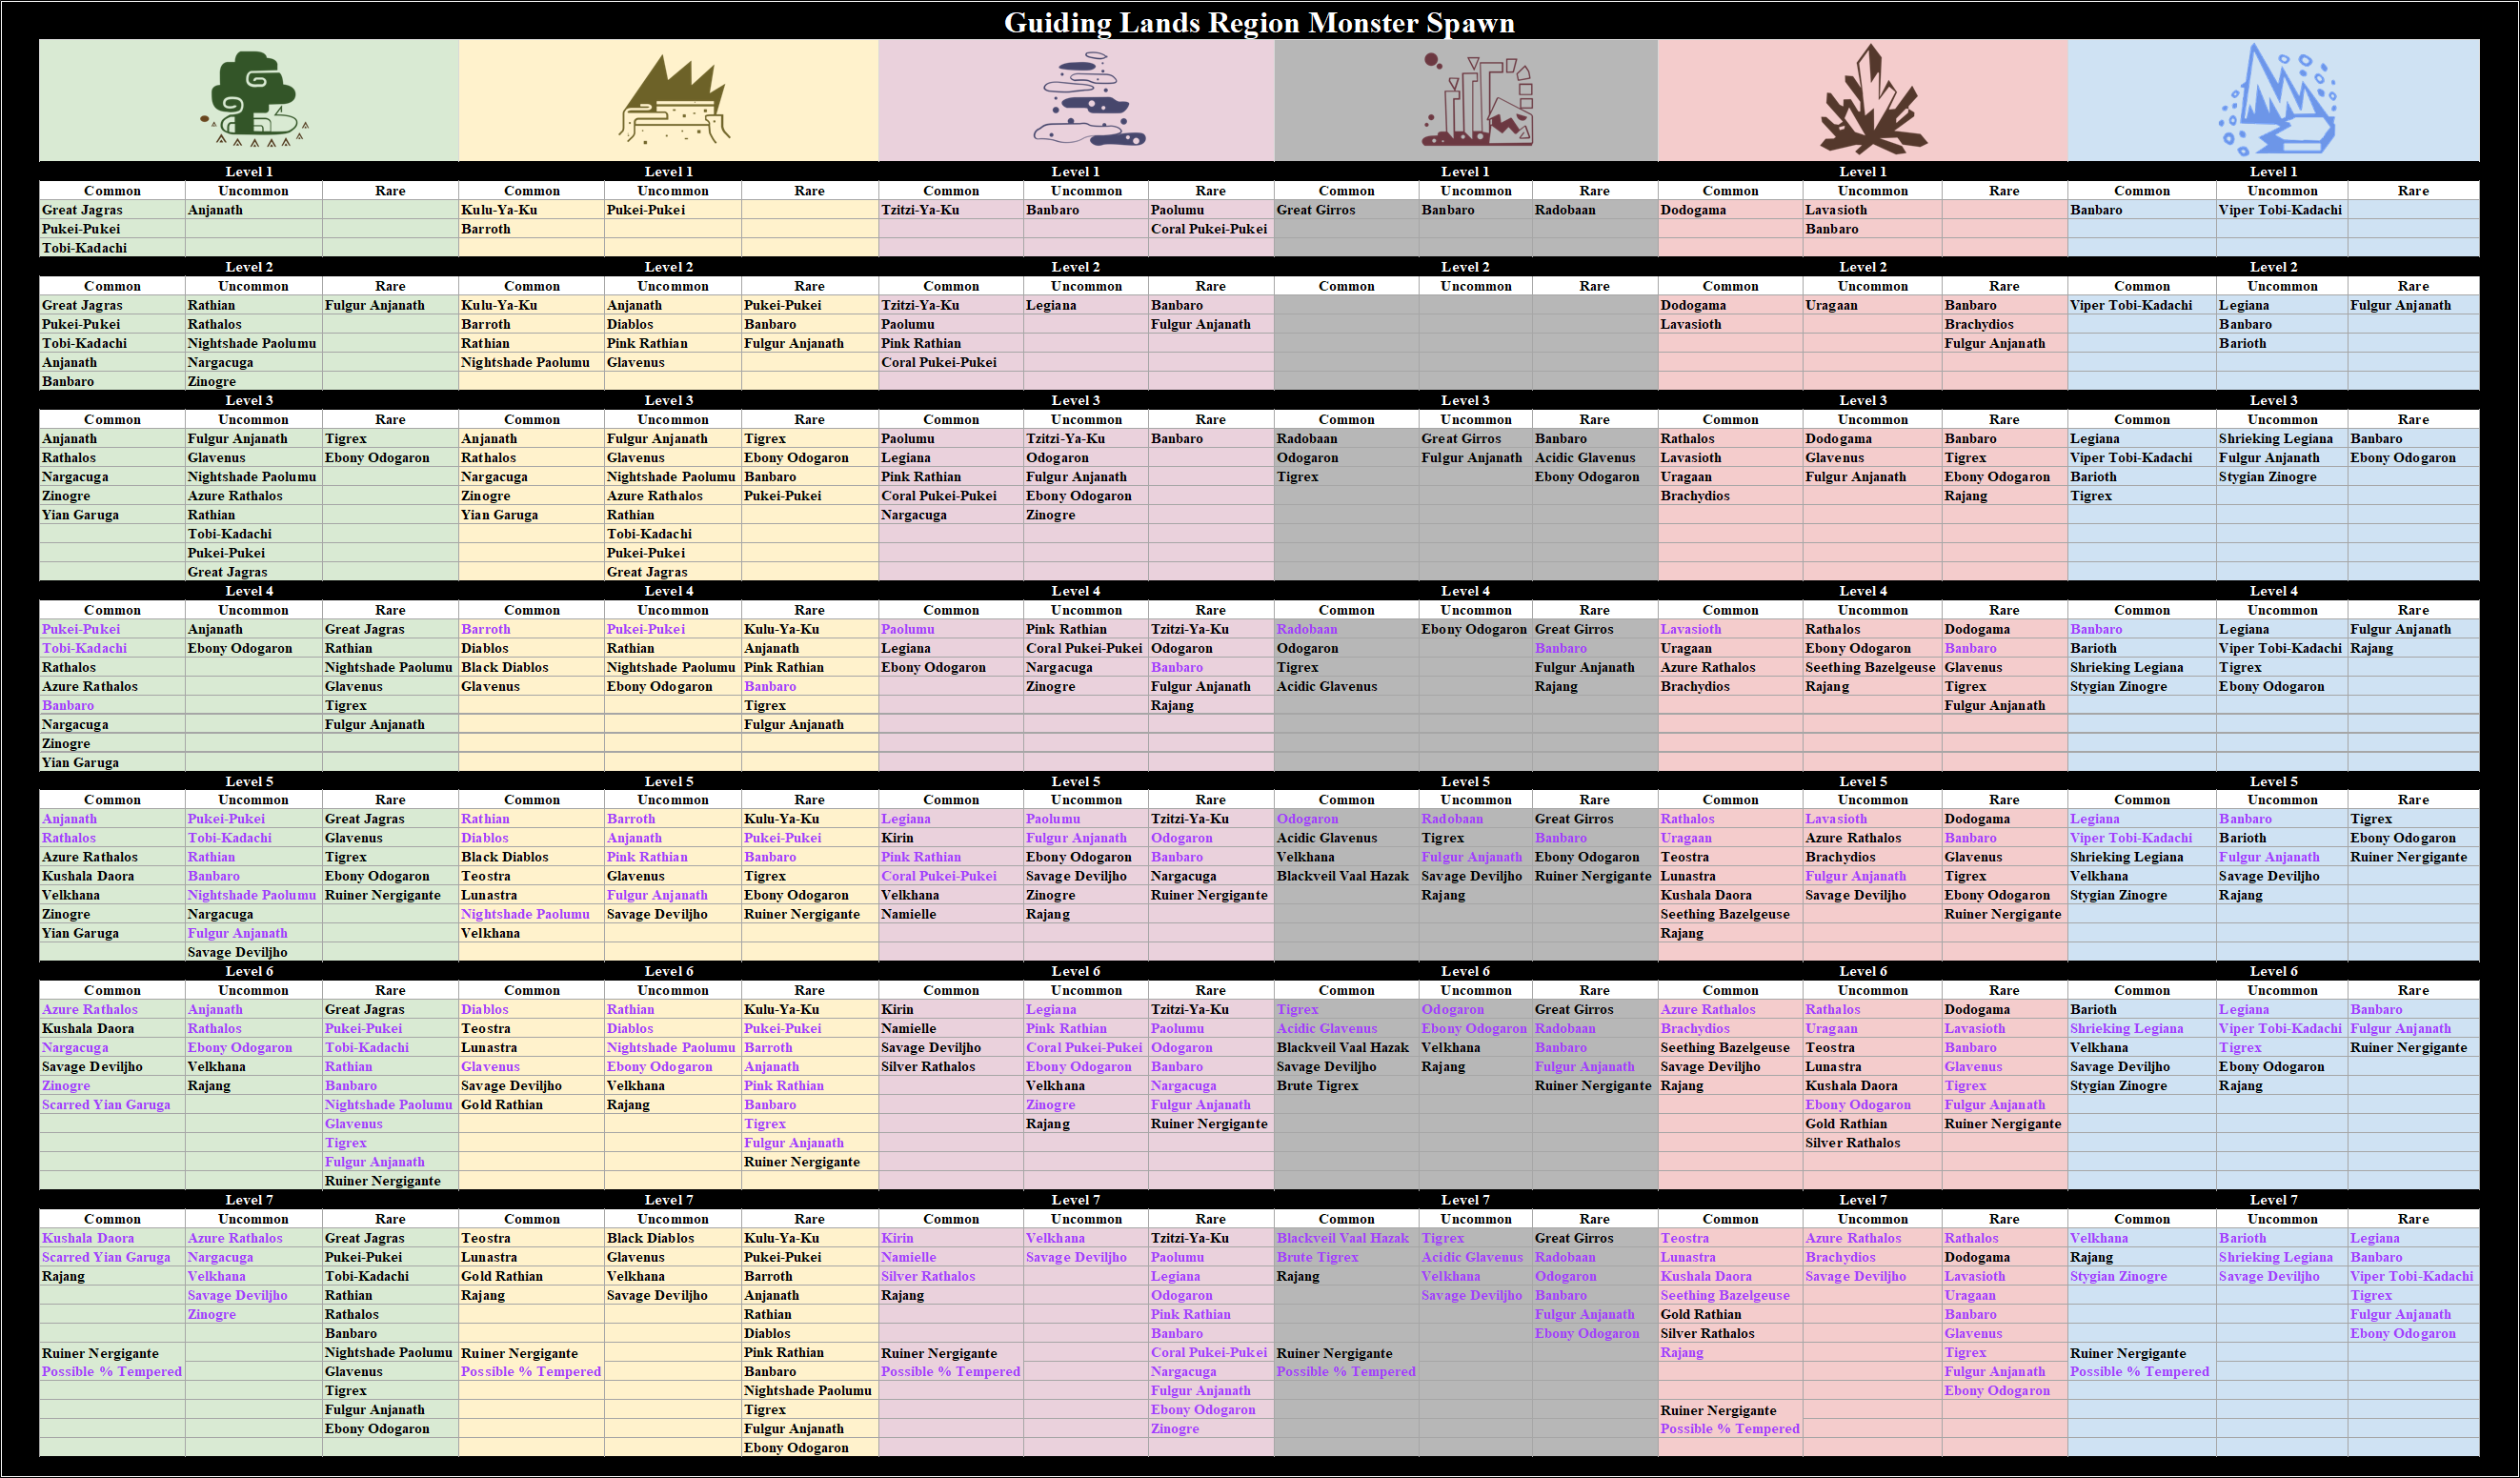
This section lists all the Regions and the monsters found within them at the different levels.
In General:
Guiding Lands Region Monster Spawn
Forest Region
Forest Region Level 1

Forest Region Level 2

Forest Region Level 3

Forest Region Level 4

Forest Region Level 5

Forest Region Level 6
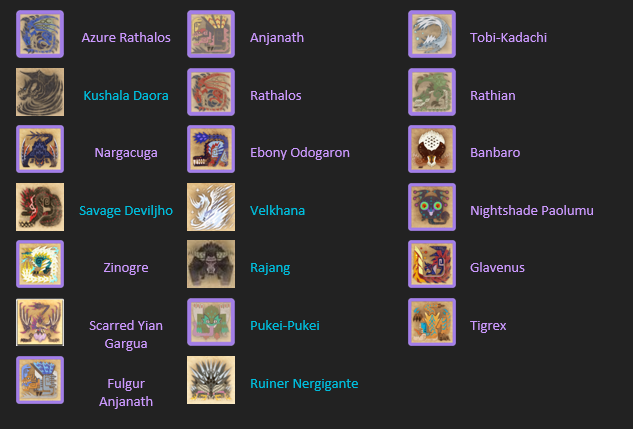
Forest Region Level 7
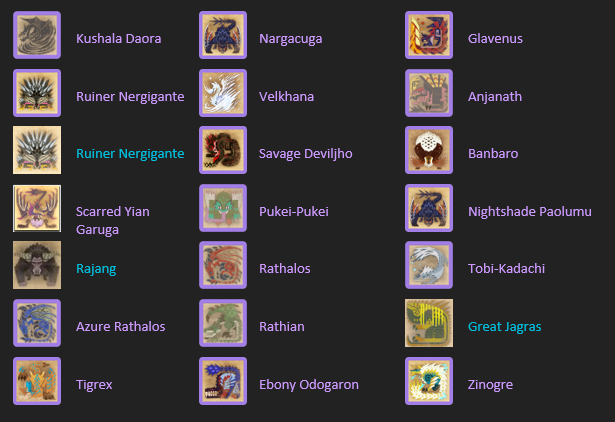
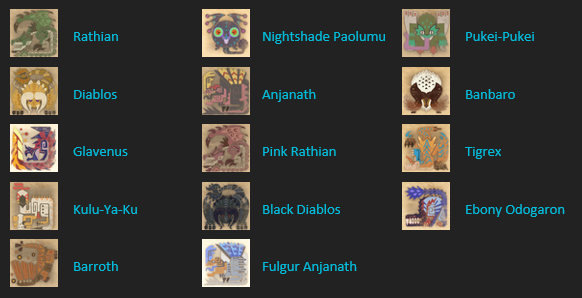
Wildspire Region
Wildspire Region Level 1

Wildspire Region Level 2

Wildspire Region Level 3
Wildspire Region Level 4

Wildspire Region Level 5

Wildspire Region Level 6

Wildspire Region Level 7

Coral Region
Coral Region Level 1

Coral Region Level 2

Coral Region Level 3

Coral Region Level 4

Coral Region Level 5

Coral Region Level 6

Coral Region Level 7

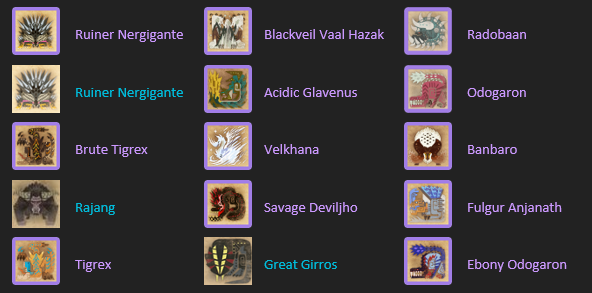
Rotten Region
Rotten Region Level 1

Rotten Region Level 2

Rotten Region Level 3

Rotten Region Level 4

Rotten Region Level 5

Rotten Region Level 6

Rotten Region Level 7
Volcanic Region
Volcanic Region Level 1

Volcanic Region Level 2

Volcanic Region Level 3

Volcanic Region Level 4

Volcanic Region Level 5

Volcanic Region Level 6

Volcanic Region Level 7

Tundra Region
Tundra Region Level 1

Tundra Region Level 2

Tundra Region Level 3

Tundra Region Level 4

Tundra Region Level 5

Tundra Region Level 6

Tundra Region Level 7
